


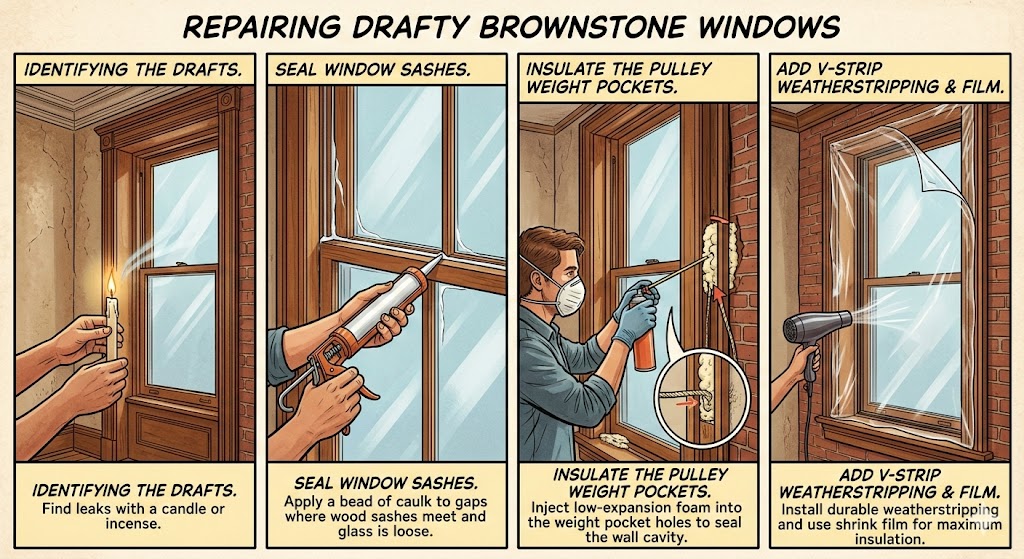
Over decades you notice cold drafts; air leaks waste heat and promote mold, so inspect sashes and glazing, repair rot, install weatherstripping or interior storm windows to cut bills.
Key Takeaways
- Inspect sashes, frames, glazing putty, and sash cords for rot, gaps, or misalignment to identify sources of drafts.
- Install quality weatherstripping and tighten or replace sash locks so sashes compress and form a proper seal.
- Add interior storm windows or removable secondary glazing to cut heat loss without altering historic exterior facades.
- Seal gaps between frames and masonry with low-expansion spray foam or flexible caulk, avoiding hard-setting foams that can deform old wood.
- Hire a preservation-minded window specialist for sash-weight repairs, reglazing, or historically accurate upgrades to balance efficiency and character.
Assessing Damage and Draft Factors
Check the frames for rot, cracked paint, and loose sashes that let in drafts; note water stains and insect tracks as signs of hidden decay. Use a flashlight and probe gently to find soft spots and mark areas where original wood frames have lost integrity.
- air infiltration at sash seams
- poor glazing putty and loose glass
- settling that pulls frames out of square
- worn weatherstripping and sash cords
Inspect interior and exterior patterns of cold and moisture to prioritize dangerous issues like structural decay and loose glass. After you map problem spots, set immediate fixes for hazards and plan restorative work.
Identifying air leaks in original wood frames
Feel around the original wood frames at sash edges, corners, and the meeting rail to detect air leaks; use a candle, smoke stick, or thermal camera for precision. You should mark small gaps for weatherstripping and larger breaches that indicate rot or missing stops requiring repair.
Evaluating the condition of historic glazing putty
Examine the putty for powdering, cracks, and gaps that allow cold air and moisture; glazing putty that flakes or pulls away often means the glass is unsecured and could fall. You should catalog panes with failed putty and note any that show sash movement. Probe the putty bed gently to test adhesion and look for underlying lead paint layers before scraping; consider testing for lead if disturbance is planned and use protective precautions when handling degraded glazing putty.
Understanding the impact of settling on window alignment
Observe sash operation for sticking, uneven gaps, or rubbing that indicate settling-related misalignment; you should inspect the jambs and sill for twist or bowing. Mark areas where frames no longer sit square and where gaps exceed typical tolerance. Measure gap widths and check for sash weight balance to determine if you can correct alignment with shims or sash adjustments, and flag any structural shifts that require a contractor's assessment.
How-to Seal Window Sashes and Frames
Begin by inspecting sash edges, meeting rails, and frame reveals for gaps, paint buildup, or rot that keeps sashes from closing fully. You should repair any wood decay first and choose sealing methods that preserve the window's historic profile, using non-invasive fixes when possible.
Applying spring bronze weatherstripping for a permanent seal
Fit spring bronze into the sash rabbet with steady pressure, tapping gently with a block to avoid deforming the metal or cracking glass; spring bronze offers a long-lasting, metal-on-metal seal that resists compression set. You should file the ends flush and check sash operation frequently while installing to prevent binding.
Installing V-seal gaskets on meeting rails
Slide V-seal into the groove on the meeting rail so the spring face compresses when the sashes close, creating an airtight barrier that still allows smooth operation; V-seal reduces drafts and improves comfort without altering sightlines. You should select the right profile thickness for a snug but non-binding fit. Measure each rail length precisely and cut the V-seal at a slight angle to avoid gaps at joints, then secure with small tacks or adhesive designed for window trim; test multiple open/close cycles to confirm the seal holds without stressing the sash balances or cords.
Caulking the exterior masonry-to-wood joints
Seal the joint between the brick and frame with a flexible, exterior-grade sealant and backer rod for gaps larger than 6 mm, tooling a smooth bead to shed water; avoid blocking masonry weeps or drainage paths. You should remove old failing caulk and prime porous wood for adhesion. Allow the sealant to cure per manufacturer directions and inspect after the first wet weather to confirm adhesion and absence of shrinkage; use a breathable product where masonry needs to vent to prevent trapped moisture. You should wear gloves and eye protection when tooling and removing old material.
Restoring Glazing and Glass Integrity
Carefully inspect sash edges, muntins, and glass for gaps, soft putty, or displaced glazing points so you can map repairs. Mark areas where air leakage and moisture have entered and prioritize sash that threaten frame rot or glass breakage. Next plan repairs that preserve historic glass whenever possible, using appropriate materials and methods that match sight lines and profiles. Expect better comfort and a smaller heating bill after you address failing seals and improve thermal performance.
Removing and replacing cracked historic glass
Begin by protecting yourself: wear heavy gloves, eye protection, and a dust mask before removing panes to avoid sharp shards and potential lead dust. Work on a stable surface and dispose of broken glass in a puncture-proof container. Keep original panes when they are intact; replace only badly cracked pieces with matching cylinder or crown glass for appearance and value. Use small sash lifters and light caulking to seat new panes, and label removed panes for archival reference.
Mastering the application of glazing points and putty
Fit glazing points every 4-6 inches to secure the pane, pressing them gently with a putty knife so you do not stress the glass. Check that points sit below the sightline and do not rest on the glass edge to avoid cracking. Allow fresh linseed-oil putty to form a skin before painting; this prevents trapped moisture and ensures adhesion. Apply paint within the manufacturer's recommended window to lock the joint and reduce future shrinkage. Use a firm, concave finish with a glazing tool to shed water and compact the putty against the frame; a smooth bead both protects the joint and restores the sash profile. Strike the putty toward the exterior and seal corners for a clean, durable result.
Enhancing thermal performance with interior storm inserts
Upgrade with removable interior storm panels to add R-value without altering exterior facades; they create an insulating air space while remaining reversible for preservation standards. Choose acrylic or glass options sized to compress gently against seals for a snug fit. Install magnetic or compression gaskets so you can remove inserts seasonally and maintain operability for fire egress and cleaning. Properly fitted inserts deliver noticeable comfort gains and reduce drafts while keeping the original sash intact.
Strategic Maintenance for Longevity
Factors influencing wood rot and moisture retention
Exposure to prolonged wetting, failed paint, poor flashing and trapped condensation accelerates wood rot and increases moisture retention; you should prioritize drainage and breathable finishes to limit decay. Inspect sills, joints and glazing putty for soft spots and staining, since mold and structural failure follow hidden dampness.
- Failed flashing around sash and lintels
- Ponding at sills or exterior trim
- High interior humidity and condensation
- Peeling paint and cracked caulk
Perceiving early surface discoloration or a spongy feel lets you act before costly replacement is required.
Annual inspection checklists for historic hardware
Inspect hinges, sash lifts, pulleys and fasteners for corrosion, wear and loose screws; you should test operation under load and note sticking points that indicate misalignment. Lubricate pivot points with appropriate non-synthetic oils, and avoid penetrating lubricants that attract dust to original finishes. Follow a simple log: record date, issues found, parts cleaned or replaced and photos—this improves repairs and preserves historic hardware provenance while preventing progressive damage.
Protecting original finishes from extreme temperature shifts
Shield original wood and paint by controlling interior humidity and installing storm windows or insulated shades to buffer temperature shifts; you should use UV-filtering films and reversible conservation coatings to reduce thermal stress. Avoid rapid heating from space heaters or direct sun that causes cracking and delamination of original finishes.
| Protective Measure | How it Helps |
|---|---|
| Storm windows / interior panels | Damps temperature swings and cuts condensation |
| Humidity control (40-55%) | Prevents shrinkage and swelling cycles |
| UV film / low-E glass | Reduces sun damage and fading |
| Reversible conservation coatings | Protects finish without permanent alteration |
Maintain regular monitoring of interior climate and inspect finishes seasonally so you can catch micro‑cracking and intervene before irreversible loss of the original finishes.
Summing up
Drawing together, you should focus on tightening sashes, replacing worn weatherstripping, reglazing loose panes, and adding interior or exterior storm windows to reduce drafts while protecting historic woodwork. You can seal gaps with paintable exterior caulk, fit sash locks and spring balances, and insulate with removable window inserts for winter comfort. You should consult a conservation-minded glazier for major repairs to maintain period appearance.
❄️ Stop drafts, preserve character
GoHandyFix specializes in historic window restoration. Our craftsmen understand brownstone architecture and use period-appropriate methods. Call (617) 861-8322 for a free assessment.
🔧 Related Services
📋 Free Quote
Get a preservation-focused assessment for your brownstone's windows. No obligation, just expert advice.
📞 Need Help Now?
Speak with a historic window specialist
(617) 861-832224/7 emergency service available
📚 Related Articles
🏗️ Serving
- ✓ Beacon Hill
- ✓ Back Bay
- ✓ South End
- ✓ Cambridge
- ✓ Brookline