


Safety starts when you install sturdy safety gates, anchor furniture, and secure loose items to prevent dangerous tip‑overs, giving you stronger protection against falls and crush injuries. For complex installations, hire experienced professionals to ensure everything meets safety standards.
Key Takeaways
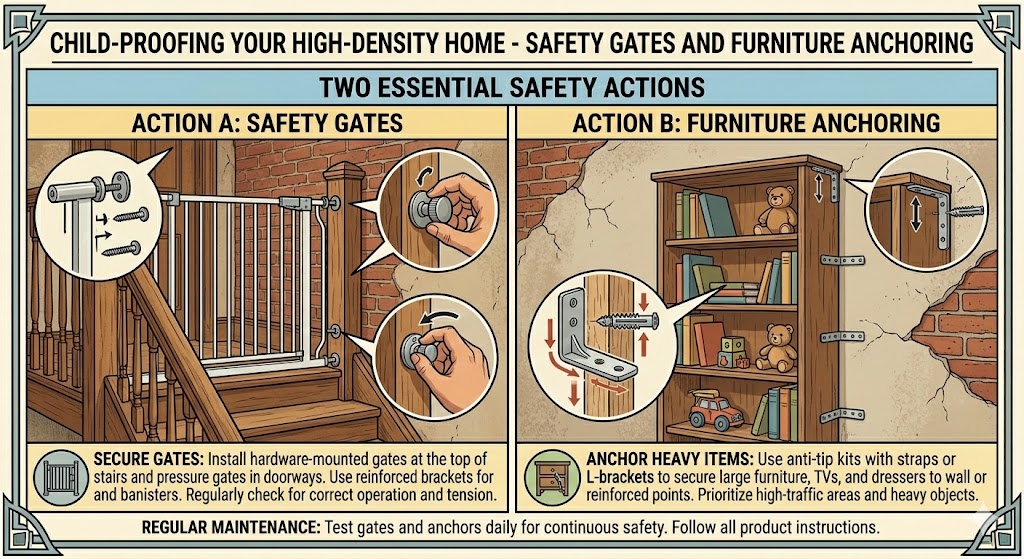
Select the right gate type: hardware‑mounted gates for the top of stairs, pressure‑mounted gates for doorways, with heights and latch mechanisms that exceed a child’s reach.
Anchor tall and heavy furniture to wall studs using tested brackets or straps rated for tip‑over prevention and place heavy items and TVs on lower shelves.
Inspect gates and anchors monthly, tighten hardware, and replace any worn or damaged components immediately.
Choose narrow, retractable, or removable gates and low‑profile anchors to preserve floor space in compact, high‑density units.
Eliminate climbing aids near anchored furniture, secure blind and appliance cords out of reach, and pad sharp corners in play areas.
Optimal Gate Placement for Traffic Control
Place gates at primary entry points to channel movement through wider paths, minimizing cross‑traffic near furniture clusters. You should position gates so you keep main egress clear and create sightlines to supervise children while preventing access to high‑risk areas.
Consider mounting gates where flow naturally narrows—hallways, doorways, and between living zones—to slow toddler roam and reduce collisions with anchored furniture. You should use gates with reliable locking mechanisms and leave a clear path for adults.
Securing Staircases and Vertical Transitions
Install hardware‑mounted gates at the top of stairs and strong gates at the bottom to prevent falls. You should avoid pressure‑mounted models at the top because they can fail under load; anchor gates directly to framing whenever possible.
Choose gates with one‑handed release for quick adult access and inspect hinges and mounts monthly. You must keep a narrow, unobstructed zone on both sides to reduce tripping and ensure rapid evacuation if needed.
Establishing Boundaries for Kitchens and Utility Zones
Block kitchen entries during meal prep with a gate that secures to studs; you should create a safe workspace and stop toddlers from reaching hot surfaces and sharp tools. Keep gates high enough that kids cannot climb.
Use adjacent drawer and cabinet locks, stove knob covers, and appliance latches to extend the boundary beyond the gate. You will combine physical barriers with locked hazards for layered protection.
Ensure bulky cooking equipment and cleaning supplies are stored out of reach or locked, and anchor freestanding ranges or tall appliances so they cannot tip if a child climbs; this reduces the risk of burns, poisoning, and furniture tip‑over.
Professional Furniture Anchoring Standards
Anchors should meet recognized load and testing standards, so you must choose hardware rated for combined weight and for the dynamic forces children create when climbing. Inspect labels and favor tested, tension‑rated systems while following manufacturer specifications for attachments and torque.
Professionals often recommend anchoring directly to load‑bearing studs or using rated plates in masonry; you should document method and compliance for multi‑unit rules. You should also have installations verified by a qualified installer when building management or code requires it – our team can help with that verification.
Identifying Load‑Bearing Studs in Multi‑Unit Walls
Use a high‑sensitivity stud finder designed to detect double studs and metal framing; you should scan vertically, mark locations, and compare with known wall assemblies. Confirm findings with a small inspection hole to avoid guessing.
Inside shared walls, you must account for staggered studs, fire blocks, and sound insulation that mask true stud centers; you should consult building plans or management if layout is unclear. Avoid anchoring where wiring or plumbing runs—those create a serious safety hazard.
Selecting Tension‑Rated Anti‑Tip Hardware Kits
Choose kits that list a tested load rating above your furniture's weight and specify compatibility with drywall, masonry, or metal studs; you should prefer systems labeled tension‑rated for dynamic resistance. Verify published test data and manufacturer clearance for the furniture model.
Check that kits include both wall‑ and furniture‑side hardware, mounting plates, and clear torque instructions; you must replace any missing parts before installation. For masonry or metal studs, select anchors explicitly rated for those substrates to avoid false claims of universality.
Follow a concise installation checklist: verify stud depth and location, drill appropriate pilot holes, torque fasteners to spec, and test for movement after mounting; you should re‑check periodically and keep photos/receipts for building records.
Securing High‑Risk Storage and Media Units
Storage units and media cabinets often hold heavy electronics and stacked items, so you should anchor them to studs or use heavy‑duty wall brackets to prevent toppling in tight spaces. If you’re unsure about the wall condition, consult an electrician to rule out hidden wiring before drilling.
Walls with multiple mounting points let you distribute force; you should prefer long lag bolts or toggle anchors and keep heavy items on lower shelves to reduce the risk of injury.
Stabilizing Tall Bookshelves and Heavy Dressers
Bookshelves and dressers are common climb targets, so you must attach anti‑tip straps or L‑brackets into studs and move bulky items to the bottom to lower tipping potential.
Attach drawer stops and keep drawers closed when not in use; you should also bolt units that sit on uneven floors and use furniture pads to prevent sliding during busy household traffic.
Anchoring Television Sets and Media Centers
Televisions mounted on stands can become hazards, so you should either wall‑mount using a certified bracket or secure the set to the media console with anti‑tip straps to avoid severe injury.
Mount brackets rated for your screen size and use proper fasteners into studs or masonry; you should route cords out of reach and keep remotes and consoles on higher shelves when children are present.
Consider verifying VESA patterns and weight ratings before purchase, and if you use a stand, fix the stand to the wall with straps designed for flat‑screens so you achieve a stable, long‑term solution.
Long‑Term Maintenance and Safety Audits
Inspect gates, anchors, and straps quarterly for loose anchors, frayed straps, or wobbly furniture. If you find wear or movement, replace hardware or re‑tighten immediately so you keep children safe.
Performing Routine Hardware and Tension Inspections
Check mounting screws and wall anchors monthly, testing gate tension and watching for gap hazards or warped rails. Tighten or replace components so you ensure the gate remains properly tensioned and anchored.
Adapting Safeguards to Child Development Stages
Adjust barriers as mobility increases: lower latches, raise anchors, and remove reachable footholds when your toddler starts standing or cruising so you prevent climbing attempts. Swap to gates with top‑lock latches as needed.
Monitor behavior after milestones and re‑evaluate setups, updating anchors and gate settings to reduce risks like tipping or pinching, and document changes so you can track what works.
Conclusion
Following this, you should install hardware‑mounted safety gates at stairways and use pressure‑mounted gates only for short‑term barriers. You must anchor bookcases, dressers, and TVs to studs with tested brackets and keep tempting items off low shelves to reduce climbing. You should inspect anchors and gates monthly and after any rearrangement to maintain protection.
Need help making your home safe?
From gate installation to furniture anchoring, GoHandyFix provides expert child‑proofing services. Contact us today for a free consultation and keep your little ones protected.
Related Services
Get Your Free Quote
Let our pros handle your child‑proofing installation safely and efficiently.